
INTRODUCTION
If you are here reading this now, there is a chance you already know about the benefits of learning Linux and Bash Scripting, but if you don’t, fret not, you’ll get the memo shortly.
First things first, What is Linux?
Linux is an operating system just like Windows or macOS, but with a key difference – it’s open-source.
This means that it’s free to use, modify and distribute, and its source code is available to anyone who wants to study or improve it.
With Linux, you have complete control over your system, which is not the case with proprietary operating systems.
Bash scripting on the other hand is like having your own personal assistant who can perform tasks for you automatically. Just like the name sounds:
It’s basically having a list of commands written in order you want them executed. It helps you automate repetitive tasks, thereby saving you a whole lot of time.
It’s a powerful scripting language native to Unix-based systems, Bash enables users to create customized scripts to automate tasks, simplify workflows, and boost productivity.
I had already put a post together for bash scripting and its benefits here, I strongly recommend you read it up, if you are new to bash scripting and would like to know more.
So, why should you really put in the hours and learn Linux and bash scripting today? I have also written a post on the reasons why learning Linux is such a great investment, to start reading this post right now click here.
Now you that you have gotten memo, you will appreciate more the benefits of Linux and Bash Scripting as we delve into the practical aspect of this tutorial.
Shall we begin??
We will start by installing Linux as a virtual machine. But first we would need a virtual machine software(Also known as hypervisor). In this course we will use vmware as our virtual machine software.
Meanwhile there are other virtual machine software other than vmware, like virtual box, parallel desktops and etc. But in this tutorial we will be using VMware.
WAIT! WHAT THE HECK IS VIRTUAL MACHINE?

A virtual machine (VM) is a software emulation of a physical computer that enables users to run multiple operating systems (OS) or applications on a single physical machine.
It allows for the creation and execution of a self-contained, isolated environment within which the virtual machine operates.
A virtual machine consists of two primary components: the host machine and the guest machine.
The host machine refers to the physical computer on which the virtualization software is installed, while the guest machine is the virtualized environment that runs inside the host.
The virtualization software, often referred to as a hypervisor, manages and controls the virtual machines.
It provides a layer of abstraction between the underlying hardware and the virtual machines, allowing them to share the physical resources of the host machine, such as CPU, memory, storage, and network connectivity.
Each virtual machine behaves as if it were a separate physical computer, with its own virtualized hardware components, including CPU, memory, disk space, and network interfaces.
This isolation allows multiple operating systems and applications to run simultaneously on the same physical hardware without interfering with each other.
Virtual machines offer numerous benefits, including:
Consolidation: Multiple virtual machines can be run on a single physical server, leading to better utilization of hardware resources and cost savings.
Isolation: Each virtual machine operates independently, providing a secure and isolated environment for running applications.
Testing and Development: Virtual machines are commonly used for software testing, development, and experimentation, as they can be easily created, cloned, and rolled back to previous states.
Legacy Application Support: Virtual machines enable running older or incompatible software on modern hardware by emulating the required environment.
Disaster Recovery: Virtual machines can be backed up, replicated, and restored more easily than physical machines, making disaster recovery processes more manageable.
Overall, virtual machines offer flexibility, scalability, and efficiency by allowing multiple operating systems and applications to coexist on a single physical machine.
INSTALLING VMWARE(tIME TO SPICE THINGS UP).

Enough of the tech talk, let’s get down to business. Time to gear up, we will start by installing vmware player.
The steps to this is super simple, no need for screenshots or images, once you follow the tips and try to install the software the same time, you should be good.
Meanwhile, if you happen to enroll in one our Python programming courses or Advanced Linux course, you will be walked through this on a live session.
However, you can do it on your own, it’s no rocket science.
Step 1: So we visit vmware official website/Download link.
Over there you’d see the version for windows and one for LInux, download according to your system OS.
Once you download the file, the next step would be to run the installer. You might be asked to open an account if you don’t already have one though.
Step 2: Run the Installer
Once the download is complete, locate the downloaded installer file on your PC(e.g., VMware-workstation-x.x.x-xxxxxxx.exe).
Double-click on the installer file to run it.
Step 3: User Account Control
If prompted by User Account Control (UAC), click “Yes” to allow the installer to make changes to your computer.
Step 4: VMware Workstation Setup Wizard
The VMware Workstation Setup Wizard will appear. Click “Next” to proceed.
Step 5: License Agreement
Read and accept the End User License Agreement (EULA), then click “Next.”
Step 6: Custom Setup (Optional)
If you want to customize the installation location or select specific features, you can choose the “Custom” setup type. Otherwise, leave it as the default and click “Next.” (Hey! it’s best to leave it at default).
Step 7: Product Updates (Optional)
If you want to receive product updates from VMware, you can choose to enable or disable the “Product Updates” option. Then click “Next.”
Step 8: User Experience Improvement Program (Optional)
Similarly, choose whether you want to participate in the VMware User Experience Improvement Program. Click “Next” when ready.
Step 9: Shortcuts
Choose whether you want to create desktop shortcuts or Quick Launch shortcuts. Click “Next” to continue.(It’d be nice to create shortcuts).
Step 10: Ready to Install
Review the installation summary and make sure the settings are as desired. Click “Install” to begin the installation process.
Step 11: Installation Progress
The installer will now copy files and install VMware Workstation on your Windows system. Wait for the progress bar to complete.
Step 12: License Key (Optional)
If you have a license key for VMware Workstation, you can enter it during the installation process. Otherwise, you can choose the “License later” option to use the free version.
Step 13: Installation Complete
Once the installation is finished, click “Finish” to exit the installer.
Congratulations! You have successfully installed VMware Workstation on your system. You can now launch the application from the desktop shortcut or the Start menu.
From there, you can create and manage virtual machines within the VMware Workstation interface.
Please note that the specific steps and screens may vary slightly depending on the version of VMware Workstation you are installing.
Make sure to follow any on-screen instructions and refer to the documentation provided by VMware if you encounter any issues during the installation process.
NOW LET’S INSTALL UBUNTU ON OUR MACHINE USING VMWARE:

Here’s a step-by-step guide on how to install Ubuntu as a virtual machine using VMware:
Step 1: Download Ubuntu ISO
Open a web browser and go to the official Ubuntu website (https://ubuntu.com/download/desktop).
Choose your version, depending on the year you are reading this course the version of the ubuntu will vary. However just make sure it’s the LTS version you are installing(Stable version).
Step 2: Launch VMware Workstation
Open VMware Workstation on your Windows system.
Click on “Create a New Virtual Machine” to start the virtual machine creation wizard.
Step 3: New Virtual Machine Wizard
In the wizard, select “Typical” and click “Next.”(This dialogue might not come up depending on your version of vmware).
Step 4: Guest Operating System Installation
Choose “Installer disc image file (iso)” and browse for the Ubuntu ISO file you downloaded in Step 1.
Once selected, click “Next.”
Step 5: Easy Install Information
Enter the user name, password, and virtual machine name for your Ubuntu installation.
Click “Next” when ready.
Step 6: Specify Disk Capacity
Specify the disk size for your Ubuntu virtual machine. The recommended size is at least 20 GB.
You can also choose to store the virtual disk as a single file or split it into multiple files, choose “single file”.
Click “Next” to proceed.
Step 7: Ready to Create Virtual Machine
Review the virtual machine settings and click “Customize Hardware” if you want to make any changes (such as adjusting RAM or CPU settings).
Otherwise, click “Finish” to create the virtual machine.
You can adjust the ram and cpu, core according to the configuration of your host machine.
Let’s say you have 16GB RAM, you can assign 4GB to your guest machine without slowing down your host machine. But if you have lesser RAM, you can leave it at 2GB.
Step 8: Customize Hardware (Optional)
In the Virtual Machine Settings window, you can modify various hardware settings such as memory, processor, network, and display.
Adjust the settings as desired and click “OK” to save the changes(If you know what you are doing).
Step 9: Install Ubuntu
With the virtual machine created and the Ubuntu ISO mounted, click on “Power on this virtual machine” to start the installation process.
Step 10: Ubuntu Installation
The Ubuntu installation wizard will launch. Select your preferred language and click “Install Ubuntu.”
Follow the on-screen instructions to configure your language, keyboard layout, and other settings.
When prompted to select the installation type, choose the appropriate option (e.g., “Erase disk and install Ubuntu” for a fresh installation).
Proceed with the installation by following the prompts and providing necessary information such as location, username, and password.
Step 11: Installation Complete
Once the installation is finished, you will be prompted to restart the virtual machine.
After the restart, you can log in to your newly installed Ubuntu virtual machine.
Congratulations! You have successfully installed Ubuntu as a virtual machine using VMware Workstation. You can now enjoy using Ubuntu within your Windows environment.
Please note that the exact steps may vary slightly depending on the version of VMware Workstation you are using.
NOW WHAT? GET FAMILIAR WITH COMMON LINUX COMMANDS.

So..You are all geared up now, waiting to acquire the power of automation. First things first, let’s open our new Linux terminal which we will be using 90% of the time.
If you are coming from Windows environment, you are obviously used to graphical user interface. Linux also have graphical interface but we don’t intend to be making use of it that much.
I mean, what fun would it be if we don’t unleash the full power of the command line and exercise our ultimate freedom?
Now let’s open our terminal already. You can either click on the dotted icon and open the software tray or you just hold down CTRL + ALT then hit the “T’ button on your keyboard to open your terminal.
You can also add some software you intend to use often to favorites when you open the software tray to make your life easier. To do that, just right click on the preferred software and click on “add to favorites“.
Now you got the terminal open, let’s learn some of the basic and common Linux commands:
- man
This particular command “man” is a command that will help you understand all the other commands. Just think of it as a manual to other commands. It gives you a more detailed information of other commands.
For example, there is a command called ls, it is used to list the contents of a given directory. If you don’t specify the path, it will list the contents of the current directory.
Now let’s use man to learn about this other command called ls. It’s pretty easy just run the following command:
man ls
You will in return get something like what we have in the following screenshot:
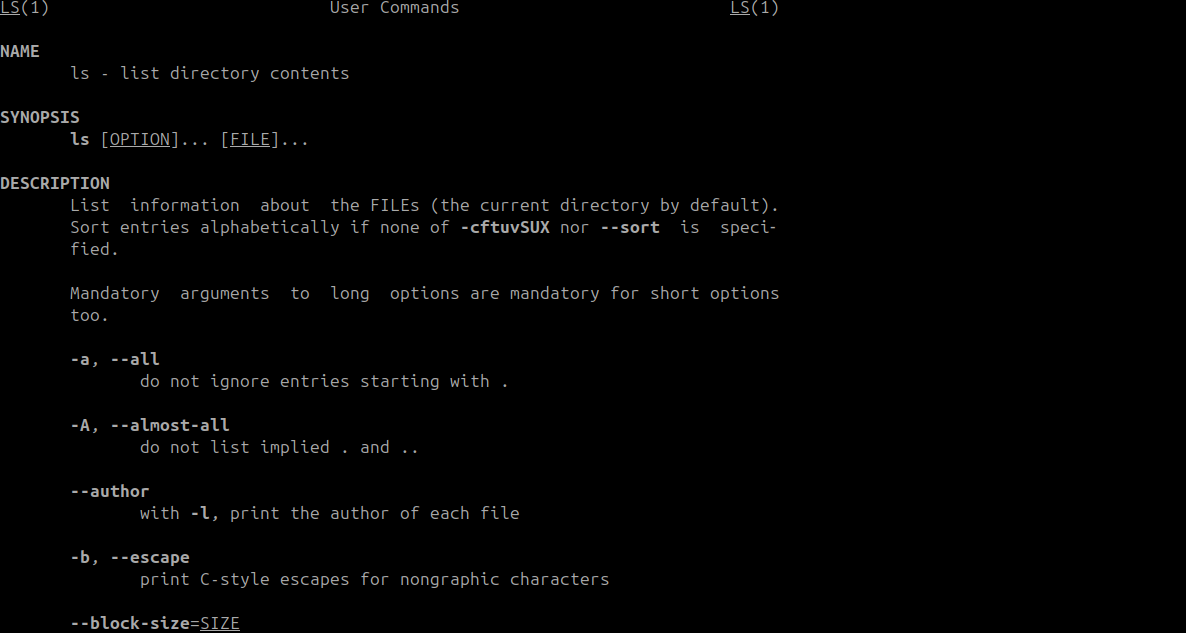
As you can read through, you just quit the man with “q”. Now isn’t that convenient?
If you want something more precise you can install tldr. However we have not reached the installing command lesson yet. So we will do that when we get to that level.
2. ls(List Files and Directories)
You already have an idea what the ls command is used for, but I will go further and shed more light. You understand that ls is used to list contents of a directory of course. But how do you use it?
The commonly used options include:
ls: List files and directories in the current directory.ls -l: Long format listing, showing file permissions, ownership, size, and modification date.ls -a: Display hidden files (those starting with a dot).
Example:
$ ls
file1.txt  file2.py  directory1/
$ ls -l
-rw-r--r--  1 user  user   1024 Jul 15 10:00 file1.txt
-rwxr-xr-x  1 user  user    750 Jul 15 09:30 file2.py
drwxr-xr-x  2 user  user   4096 Jul 15 08:45 directory1
Like I mentioned earlier, if you do not specify the actual directory you want to list its contents, it will list the the contents of the current directory.
But if you’d like to list a certain directory other than where you are, then you specify the directory using the following example:
ls Documents
The command above will list the contents of the Documents folder for you. Now let’s move to the next command.
3. pwd(Print Working Directory)
This particular command displays the current working directory. It tells you exactly where you are in the Linux file system.
Let say I started working on my system from the home directory and for some reason I had to navigate to the Downloads folder, then I decided to be sure am at the Downloads folder, I’d simply run the following command:
$ pwd
/home/user/documents
The “user” will be replaced by my name. Why don’t you try these right now and see for yourself?
Now let’s move to the next command which is cd command.
4. cd(Change Directory).
Yeah you heard right, it’s used to change directory(navigation). You can use this command to move from one directory to another. Let’s see an example of this command below:
$ cd Documents
Let’s say you are already in the home directory , the command above will take you to the Documents directory/folder.
You can also navigate to sub-folders as well:
$ cd /Videos/movies/action
You can also move a step above your current working directory like this:
cd ..
Remember you can always use the man command to learn more about these commands and the available options. Time to move onto the next command.
5. mkdir(Make directory).
With this command you create a new directory/folder:
$ mkdir new_directory
You can also create multiple directories as well:
$ mkdir new_directory new_directory2 new_directory3
You can also create multiple nested directories/folders by adding the -p option:
mkdir -p movies/action
Always make use of the man command to get more information.
6. rmdir(Remove directory)
Just as you can create directory, you can also remove them. Only that the directory has to be empty first:
$ rmdir new_directory
$ rmdir new_directory new_directory2 new_directory3
As you can see, you can also remove multiple directories just the same way you could create multiple directories.
7. rm -r(Remove recursively)
For me, when I want to remove a folder, I like using rm-r as it removes both the folder and files inside. But hey! be careful, because once you use these command, those files and folders are not going into the recycle bin, they are being deleted forever.
8. touch(Create a file).
So you learnt how to create a folder, now you learn how to create a file:
$ touch new_textfile.txt
You can also create multiple files as well:
$ touch new_textfile.txt new_pythonfile.py new_script.sh
Of course, to remove a file you can simple use rm <file name>
9. cat(Concatenate and Display File Content)
The cat command displays the content of a file, let’s say you have text file called “notes.txt”, where you wrote some quick notes on your training, you can just display them quickly on your terminal using the following command:
$ cat notes.txt
Let me give you a quick tip. Anytime you are typing a name of a folder or a file on the command line, once you type in the first 3 letters, and you are sure there is no other folder nor file that starts with that those 3 letters, just hit the tab button and the shell will autocomplete it for you.
The auto-completion will save you some time, may be a little but it’s something.
10. mv (Move or Rename Files and Directories)
The mv command is used to move directories/folders and files. It can also be used to rename a file or folder, if the folder or file exists already:
$ mv file.txt /path/to/destination/
$ mv old_name.txt new_name.txt
You can also move multiple files once by listing them all, just like you do with creating files and folders.
11. cp(Copy Files and Directories)
The cp command copies files and directories. But to copy folders and it’s contents, you would need to add the -r option to recursively copy the entire folder contents:
$ cp file.txt /path/to/destination/
$ cp -r directory /path/to/destination/
Now it’s time to get into real some mini advanced stuff, we will begin with the find command:
12. find
The find command is a powerful utility in Linux that allows you to search for files and directories based on various criteria.
It is a versatile tool that enables you to locate files based on names, types, sizes, modification times, and more. In this guide, we’ll explore the usage of the find command along with practical examples to illustrate its capabilities.
Basic Syntax:
find <path> <expression> <action>
<path>: Specifies the starting directory for the search. If omitted, it defaults to the current directory.<expression>: Defines the criteria for locating files and directories.<action>: Optional argument that specifies actions to be performed on the found items.
Example 1: Find Files by Name
To find files with a specific name, you can use the -name option. The search is case-sensitive.
$ find /home/user/documents -name "file.txt"
Example 2: Find Files by Type
You can search for files based on their type using the -type option. Common types are f for regular files and d for directories.
$ find /home/user/documents -type f
Example 3: Find Files by Size
To search for files based on their size, you can use the -size option. The size can be specified in bytes (c), kilobytes (k), megabytes (M), gigabytes (G), etc.
$ find /home/user/documents -size +1M # Find files larger than 1 megabyte.
Example 4: Find Files by Modification Time
You can locate files based on their modification time using the -mtime option. The argument represents the number of days since the file’s content was last modified.
$ find /home/user/documents -mtime -7 # Find files modified within the last 7 days.
Example 5: Find Files by Permissions
To search for files based on specific permissions, you can use the -perm option. The argument is an octal number representing the permission mode.
$ find /home/user/documents -perm 644 # Find files with permission mode 644.
Example 6: Find Files and Execute Actions
The find command can be used with various actions to perform tasks on the found items. For example, you can delete files, execute commands on them, or move them to another location.
$ find /home/user/documents -name "*.tmp" -delete # Delete all files with .tmp extension.
Example 7: Find and Execute Commands
You can execute commands on the found files using the -exec option. Replace {} with the filename placeholder and terminate the command with ;.
$ find /home/user/documents -name "*.txt" -exec chmod 644 {} ; # Set permissions to 644 for all .txt files.
Example 8: Combine Multiple Expressions
You can combine multiple expressions to narrow down your search using logical operators such as -and, -or, and -not.
$ find /home/user/documents -name "*.jpg" -and -size +1M # Find .jpg files larger than 1 megabyte.
The find command is an invaluable tool for locating files and directories in Linux based on various criteria. Its flexibility and numerous options make it a powerful asset for sysadmins and Linux users alike.
By mastering the find command, you can efficiently manage and organize your files and perform complex searches with ease.
Always be cautious when using actions like delete or modify, and double-check your commands to avoid unintended consequences.
13. chmod(Permission)
In Linux and Unix-based operating systems, file permissions are represented using a set of three numbers, known as chmod (change mode) permissions.
These three numbers define the read, write, and execute permissions for the owner, group, and others (everyone else) on a file or directory.
Each number is a combination of three bits (0 or 1), where 1 indicates permission is granted, and 0 indicates permission is denied.
The three numbers are usually represented in octal (base-8) format. Here’s a breakdown of what each number represents:
- The first number represents the permissions for the owner of the file.
- The second number represents the permissions for the group that the file belongs to.
- The third number represents the permissions for others, which include all users who are not the owner and not in the group.
Each number is calculated by adding up the values for the read, write, and execute permissions:
- Read (r): 4
- Write (w): 2
- Execute (x): 1
To calculate the permission number, simply sum up the values for the desired permissions. For example:
- To grant read and write permission (r+w), the number would be 4 + 2 = 6.
- To grant read, write, and execute permission (rwx), the number would be 4 + 2 + 1 = 7.
- To grant only execute permission (x), the number would be 1.
Here are some common chmod permission combinations:
- 0: No permissions (—)
- 1: Execute only (–x)
- 2: Write only (-w-)
- 3: Write and execute (-wx)
- 4: Read only (r–)
- 5: Read and execute (r-x)
- 6: Read and write (rw-)
- 7: Read, write, and execute (rwx)
To set file permissions using chmod, you can use either the octal representation or symbolic representation. For example:
- Octal representation:
$ chmod 644 file.txt # Sets read and write for the owner, and read for the group and others.
2. Symbolic representation:
$ chmod u+rw,g+r,o+r file.txt # Same as above, read and write for the owner, read for the group and others.
Remember that changing file permissions should be done with caution, as improper settings can compromise security or disrupt the functionality of files and directories.
It’s always a good practice to set the minimum necessary permissions required for files and directories to maintain security and privacy on your system.
14. chown Command in Linux: Ownership Management Simplified
In Linux and Unix-based operating systems, file ownership plays a crucial role in determining access permissions and security.
The chown (change owner) command is used to change the ownership of files and directories, allowing administrators to assign new owners and groups.
In this guide, we’ll delve into the chown command’s usage, options, and provide practical examples to demonstrate its functionality.
Basic Syntax:
chown [options] [new_owner][:new_group] <file/directory>
[options]: Optional flags that modify the behavior of the command.[new_owner]: The user or UID (user ID) to whom the ownership will be changed.[new_group]: The group or GID (group ID) to which the file/directory will be assigned. If omitted, the group remains unchanged.<file/directory>: The file or directory for which you want to change the ownership.
Example 1: Changing File Ownership
To change the ownership of a single file, use the chown command followed by the new owner’s username and the target file name.
$ chown john file.txt # Assign file.txt to user "john."
Example 2: Changing Directory Ownership
Similarly, you can change the ownership of a directory using the same command.
$ chown mary:users directory # Assign "mary" as the owner and "users" as the group for "directory."
Example 3: Changing Ownership Recursively
The -R option allows you to change ownership recursively for all files and subdirectories within a directory.
$ chown -R jenny:staff project_directory # Change ownership of "project_directory" and its contents to "jenny" and group "staff."
Example 4: Change Group Ownership Only
If you want to change only the group ownership while keeping the user ownership intact, omit the username and specify only the new group.
$ chown :developers script.sh # Change the group ownership of "script.sh" to "developers."
Example 5: Using Numeric User and Group IDs
Instead of using usernames and group names, you can also use numeric User IDs (UIDs) and Group IDs (GIDs) with the chown command.
$ chown 1001:1001 data.txt # Change ownership to UID 1001 and GID 1001 for "data.txt."
Example 6: Preserve Symbolic Links
By default, chown follows symbolic links and changes ownership on the linked file. To preserve the symbolic links, use the -h option.
$ chown -h jane:sales symlink.txt # Change ownership of the symbolic link "symlink.txt" itself, not the linked file.
Example 7: Verbose Mode
The -v option enables verbose mode, displaying a message for each file/directory whose ownership is changed.
$ chown -v admin:admins file1.txt file2.txt # Change ownership and display a message for each file changed.
The chown command is a powerful tool for managing file ownership and group assignments in Linux.
Understanding its syntax and options allows you to modify ownership efficiently, helping to ensure proper access control and security on your system.
Always exercise caution when changing ownership, especially with the -R option, to avoid unintended consequences. By using chown wisely, you can maintain a well-organized and secure file system on your Linux machine.
Demystifying sudo in Linux: Elevated Privileges Made Secure
sudo (short for “superuser do”) is a crucial command in Linux that allows authorized users to execute commands with elevated privileges, usually as the root user.
With sudo, system administrators can perform administrative tasks while enforcing security measures, ensuring that only trusted users can access privileged operations.
In this guide, we will explore the usage and importance of sudo with practical examples to demonstrate its capabilities.
Basic Syntax:
sudo [options] command [arguments]
[options]: Optional flags that modify the behavior ofsudo.command: The command you wish to execute with elevated privileges.[arguments]: Optional arguments passed to the command.
Example 1: Running a Command with sudo
To run a command with elevated privileges, simply prepend sudo before the command. You will be prompted to enter your user password to authenticate.
$ sudo apt update # Update the package list using the package manager (apt) with elevated privileges.
Example 2: Running GUI Applications with sudo
Graphical applications may require sudo to be executed with graphical support. The -E option preserves the user’s environment variables.
$ sudo -E gedit # Open the text editor gedit with elevated privileges while preserving environment variables.
Example 3: Running Multiple Commands with sudo
To run multiple commands consecutively with sudo, use the && operator to separate them.
$ sudo apt update && sudo apt upgrade # Update the package list and upgrade installed packages with elevated privileges.
Example 4: Edit a Protected File with sudo
Some system configuration files, like /etc/hosts, require root privileges to modify. Use sudo with a text editor to edit these files.
$ sudo nano /etc/hosts # Edit the hosts file using the nano text editor with elevated privileges.
Example 5: Administrative Tasks with sudo
Perform various administrative tasks, like managing users or restarting services, using sudo.
$ sudo useradd newuser  # Create a new user account with elevated privileges.
$ sudo service apache2 restart  # Restart the Apache web server with elevated privileges.
Example 6: Dealing with Permissions Errors
Sometimes, regular users encounter permissions errors when accessing certain files or directories. sudo can be used to bypass these errors.
$ cp important_file /opt/backup/  # Permission denied error.
$ sudo cp important_file /opt/backup/  # Successful copy with elevated privileges.
Example 7: sudoers Configuration
The /etc/sudoers file defines which users and groups have sudo privileges and what commands they can execute. Use visudo to edit it securely.
$ sudo visudo # Open the sudoers file using the nano text editor with elevated privileges.
sudo empowers Linux system administrators to execute critical commands with elevated privileges while maintaining a secure environment.
By utilizing sudo, users can accomplish administrative tasks without needing to log in as the root user, reducing the risk of unintentional system modifications or security breaches.
Understanding and using sudo responsibly helps ensure that the system stays secure and stable, granting administrators the flexibility they need to manage their Linux systems effectively.
Always exercise caution when using sudo and only grant access to trusted users to maintain the integrity of your system.
Here is a quick tip for you: In a case whereby you forgot to put sudo when necessary and you got permission denied error. No need to repeat the entire command, just type in sudo !! and the previous command will be run with sudo.
WHAT NEXT? GET FAMILIAR WITH INSTALLING and managing PACKAGES:

Pumped up with commands yet? Now it’s time to make your first installation, we will start by updating and upgrading the apt cache(ie updating and upgrading packages using apt).
We can do that using a single line command:
$ sudo apt update && sudo apt upgrade
You will get a response back requesting for your permission to download the archives for upgrade, if you want to accept automatically without having to type in y manually, run the following command.
$ sudo apt update && sudo apt upgrade -y
ACTIVATING LINUX FIREWALL
Let’s quickly activate the Linux firewall:
$ sudo ufw enable
IMPROVE BATTERY PERFORMANCE:
Now let’s install a popular power management package that works in the background to reduce battery usage:
$ sudo apt-get install tlp tlp-rdw
$ sudo systemct1 enable tlp
COMMANDS FOR SYSTEM CLEANUP:
To clean up junk files and unwanted cache and aid smooth functioning of Linux system, we will make use of the following commands:
To clean partial packages:
$ sudo apt autoclean
The following command will remove unused dependencies:
$ sudo apt autoremove
The following command will cleanup apt-cache
$ sudo apt-get clean
You can also chain command in the following manner using &&:
$ sudo apt update && sudo apt upgrade && sudo apt autoremove && sudo apt autoclean
Now you have gotten this far, it’s time you get started with bash scripting. However, if you’d like to get more advanced and in depth Linux training, don’t hesitate to request for a 1 on 1 personalized, remote Linux training.
Alternatively, you can also get more advanced Linux training for free, just by enrolling on our advanced python training(From zero level experience to advanced level).
GETTING STARTED WITH BASH SCRIPTING
I have earlier on this tutorial referenced a post on bash scripting and its benefits. If you are new to bash scripting, you should read it up before continuing with this tutorial, because we are going straight to the practical from here.
bash scripting 101:
In this tutorial you learn the basics of Bash scripting, including Bash Variables, Comments, User Input, Arguments and Arrays.
More advanced concepts like Conditional Expressions, Conditionals, Loops, Functions, Debugging, testing and more will be discussed in the next Linux and bash scripting tutorial.
You can also request for a personalized and advanced Linux and bash scripting tutorial if you are interested in more advanced topics.
In order to create/write Bash scripts, you only need a UNIX terminal and a text editor like VS Code, or a terminal-based editor like nano or vim.
CREATING YOUR FIRST SCRIPT
It’s about time you show some nerves with newly acquired Linux command skills. Before we dive into creating our first bash script, let’s quickly talk about Shebang.
So what the heck is Shebang?. For you to execute/run a bash script file with the bash shell interpreter, the first line of your script file must indicate the absolute path to the bash executable: #!/bin/bash
What the Shebang does basically is to instruct the operating system to run the script with the /bin/bash executable.
Now, knowing what we already know, we will touch.. sorry we will create our first .sh script. LOLS. So will name this script first_script.sh.
$ nano first_script.sh
The command above creates and opens our .sh file in terminal based editor nano, after which we now add our Shebang: #!/bin/bash.
Now our script is ready to collect our first command. Now let’s just give it something very simple to test our script:
#!/bin/bash
echo "This is a test to confirm that our script runs"
To save a file in nano, you use CTRL O, then click enter button to save the file with the current name. Then use CTRL X to exit the editor.
Now to make our code executable we use any of the permission changing(chmod) representation we discussed earlier. In this case we just use:
$ chmod +x first_script.sh
$ ./first_script.sh
As you can see we can run our bash script with ./ followed by the script name. Alternatively we can also run it using the following syntax.
$ chmod +x first_script.sh
$ bash first_script.sh
You will see a “This is a test to confirm that our script runs” message on the screen when you run the script. Now let’s get down to something more fun.
BASH VARIABLES
Just like in most programming languages, you can also use variables in bash scripting. Only that there are no data types, and a variable in Bash can hold numbers as well as characters.
To assign a value to a variable in bash, we just use the = sign like below:”
name1="TechSwitch"
Important note: When assigning a variable never put a space between the name and value, just as you see it on the syntax above.
Now you know how to assign a variable, so how do you reference it? You just use $ as below:
echo $name1
It’s also recommended to wrap a variable inside curly brace {}, though it’s not required, just as below:
echo ${name1}
The code above would output: TechSwitch as this is the value of our name1 variable.
Now let’s use what we have learnt to make our script do something fun:
#!/bin/bash
name1="TechSwitch"
echo "Hello ${name1}"
Now when we save it and run the script again, we will see: Hello TechSwitch
You can also add multiple variables and use them as you wish:
#!/bin/bash
first_name="TechSwitch"
last_name="Geofsphere"
greeting="Hi"
echo "${greeting} ${first_name} ${last_name}"
If you save and run the code above, you will get the output: Hi TechSwitch Geofsphere
Though it’s not compulsory, but to make your code look more professional, you can add semi colon at the end of each line:
#!/bin/bash
first_name="TechSwitch";
last_name="Geofsphere";
greeting="Hi";
echo "${greeting} ${first_name} ${last_name}";
BASH USER INPUT
Instead of creating the variables yourself, you can have the user of your script assign/create the variable on the go as the script is being run.
We can write a script that will prompt the user to enter their information and we will still use the information they entered to interact with them:
#!/bin/bash
echo "What is your name?"
read name
echo "Hello ${name}"
echo "Welcome to TechSwitch, how can I assist you today?"
Try this now on your terminal. When you do, you will be prompted first to enter your name, when you do, you will be greeted Hello by your name, followed by Welcome to TechSwitch, how can I assist you today?
That was fun right? Now let’s make the code even shorter:
#!/bin/bash
read -p "What is your name?" name
echo "Hello ${name}"
echo "Welcome to TechSwitch, how can I assist you today?"
What we did above was using read -p to print a message before asking the user for input. Then we saved the user input as name. That’s also how to get user input. Don’t forget to add the name of the variable after the message.
COMMENTS IN BASH
One thing you should always keep in mind when you are writing a script or a program is: You should write it in a way others can understand and easily maintain it without hassles.
Comments, just like in most programming languages are used to leave for yourself and others important notes about your code. It helps you and your team to easily understand your code.
Now let’s see the comments in action. We will do that by commenting our script:
#!/bin/bash
#Let's get the user input
read -p "What is your name?" name
#Let's greet the user
echo "Hello ${name}"
echo "Welcome to TechSwitch, how can I assist you today?"
As you can see above, we use the # sign to comment our code by putting it in the front of which ever line we want to comment. Comments are not treated as commands. So you can also use it to disable a command temporarily.
BASH ARGUMENTS
Just the same way you pass argument on other commands, just like in read -p, rm -r, mkdir -p and etc, you can also use arguments in your scripts when running them, depending on the codes you have in the script.
We will create a new script called argument1.sh, but before we do that let’s get familiar with a few concepts:
In bash script, when run a script and pass arguments, we can use $1 to reference the first one, then use $2 for second argument, $3 for the third one as so on.
We can also use $@ to reference all the arguments, $0 to reference the script itself. Now, knowing what we know, let’s create our argument1.sh script to see the argument concept in action:
$ nano argument1.sh
Then let’s add some code inside our script to confirm how the argument thingy works.
#!/bin/bash
echo "The first Argument added is $1"
echo "The second Argument added is $2"
echo "The third Argument added is $3"
Then of course we make our script executable:
$ chmod +x argument1.sh
Then we run our script with three arguments:
$ ./argument1.sh coding scripting programming
When you run the script as above you will get the following output:
The first Argument added is coding
The second Argument added is scripting
The third Argument added is programming
Now let’s make use of the s@ in our script:
#!/bin/bash
echo "The first Argument added is $1"
echo "The second Argument added is $2"
echo "The third Argument added is $3"
echo "All the arguments are as follows: s@"
The last line we added will change the output as the following:
The first Argument added is coding
The second Argument added is scripting
The third Argument added is programming
All the arguments are as follows: coding scripting programming
Now let’s see the $0 in action:
#!/bin/bash
echo "The first Argument added is $1"
echo "The second Argument added is $2"
echo "The third Argument added is $3"
echo "All the arguments are as follows: s@"
echo "The name of this script is $0 and it will be deleted now"
rm -f $0
The last line deletes the script after running the it. This is handy when you want to self-destruct a script after running it. Make sure you have a backup before using such command, in case you don’t wish to loose the file entirely.
BASH SLICING(SUB-STRING SLICING)
In bash scripting, one such feature that comes in handy when manipulating strings is substring slicing.
Substring slicing allows you to extract a portion of a string based on its position or length, enabling you to perform various text processing tasks efficiently.
Let’s explore some practical examples so you can understand more how it works:
1. Extracting Substrings with Positional Indices: To extract a substring based on its position within a string, you can use the following syntax:
# Syntax: ${string_variable:start_index:length}
Example 1:
Suppose we have a variable fruit containing the word “banana,” and we want to extract the first three characters:
fruit="banana"
substring=${fruit:0:3}
echo $substring  # Output: "ban"
You need to understand that computer starts counting from 0. In the code above the index 3 is a but it’s always exclusive. In other words, the index where the length stops is not inclusive.
2. Extracting Substrings with Negative Indices: In Bash, you can use negative indices to count positions from the end of the string. This comes in handy when you want to extract characters from the end.
Example 2:
Extract the last three characters from the variable filename:
filename="example.txt"
substring=${filename:(-3)}
echo $substring  # Output: "txt"
3. Omitting the Length Parameter: When you omit the length parameter, Bash will return the substring from the start index to the end of the string.
Example 3:
Let’s say we have a variable message with the content “Hello, World!” and we want to extract everything after the comma:
message="Hello, World!"
substring=${message#*, }  # Note: # removes the shortest match from the beginning
echo $substring  # Output: "World!"
4. Extracting Substrings from the End: To extract substrings from the end of a string, you can use the % operator.
Example 4:
Extract the file extension from a filename stored in the variable file:
file="document.pdf"
substring=${file%.pdf}  # Note: % removes the shortest match from the end
echo $substring  # Output: "document"
5. Using Variables for Position and Length: You can use variables for start index and length to make your substring extraction dynamic.
Example 5:
Extract a substring from the sentence variable, starting at the start index, with a length defined by the len variable:
sentence="The quick brown fox jumps over the lazy dog."
start=4
len=9
substring=${sentence:start:len}
echo $substring  # Output: "quick bro"
Substring slicing is a powerful feature in Bash that enables you to process and manipulate text efficiently. With these examples, you now have a solid foundation to start using substring slicing in your Bash scripts.
Experiment with different scenarios, and you’ll find that mastering this technique will save you time and effort when working with strings in your scripting endeavors.
bash arrays
If you have the basic knowledge of programming with any language at all, then the term arrays is no longer new to you.
However, if this is your first time coming across it, the main thing that you need to know is that unlike variables, arrays can hold several values under one name.
You can initialize an array by assigning values separated by space and enclosed in ().
Example:
first_array=("value 1" "value 2" "value 3" "value 4")
For you to access the elements in the array, you need to reference them by their numeric index.
Now let’s access a single element, let’s tray and access the second element in the array (value 2)
echo ${first_array[1]}
The code above will output value 2
Now let’s use negative indexing like we learnt in slicing.
echo ${first_array[-1]}
The code above will output: value 4
To return all the items/elements in the array we use the @ sign:
echo ${first_array[@]}
We can get the total number of the elements in an array by adding the #sign at the beginning of the array name. In our case it will output 4:
echo ${#first_array[@]}
That’s it for now. It’s time to play around all you have learnt on bash scripting. Remember all what you learnt here won’t matter until you start practicing them. Now get to work!
Depending on the level of your site membership you will be seeing more advanced topics on Linux and bash scripting from time to time.
Feel free to request for more either by virtual assistance or personalized private training.
BONUS ON LINUX AND BASH SCRIPTING
- If you ever ran a command that requires a super admin privilege and you were halted, said you don’t have permission, instead of re-entering the command all over with sudo, just type in sudo !! the previous command will be run, but with sudo added this time.
- To bring out the previous commands you ran earlier use the up and down arrow key on your keyboard.
- To see all the users in your Linux based system use: cat /etc/passwd
- To reset your password, type passwd and hit enter, follow the prompts to change your password.
- To see all the commands you have been running, type in history and hit enter.
- To permanently delete the entire history, use the following command: truncate -s 0 .bash_history this lets truncate the file where the history is stored to zero size.
To keep getting tips like this more often, make sure you keep your membership subscription up to date. I hope you enjoyed this Getting started with Linux and bash scripting 101. Happy scripting techie!